Orientation & Mobility Activities
Scavenger Hunt - At Home in Plain Sight
Working with your child to explore their environment can be both fun and educational. Children learn through repeated experiences of observing, imitating and practicing. We know as educators and parents that sighted children are using their vision all of the time to learn new concepts. This type of incidental learning does not happen for our kids who are Blind and Visually Impaired. As you search your house together, encourage your child to be curious and resourceful. Be a “constant commentator” and provide them with specific descriptions to help make connections that might otherwise be only visual. Use the “Extend” ideas below to increase the level of complexity and scope of the hunt, depending on the child's age.
Activity
At Home in Plain Sight Scavenger Hunt
# of Stairs
# of Pillows
# of Doorways
# of Light Switches
# of outlets
# of trash cans
Extend
Parent-Create a clue to find each item, then have another clue waiting at that spot. Assign points to each clue. Have your child add up their total points at the end.
Practice using the items on the list. Walk up and down the stairs, put a pillowcase on one of the pillows, practice locking and unlocking a door, turn light switches on and off, plug a charger or lamp into an outlet, empty the trash can!
Student-Journal-Draw or write about your hunt and the things you found. Were there items in your house you had never noticed before? Were there discoveries that surprised you?
Scavenger Hunt - Identify & Return
The more your child explores their home environment the more confident and independent they will become. Encouraging your child to help you with organization around the house and to take care of their own possessions will help them to develop independence. Putting away toys, and everyday items in a designated spot so they can be easily located is important. But we all know that not everything that is used gets put back in its rightful place.
In this scavenger hunt, the parent will 1st collect the items on the list and will introduce the items one by one to the student. The student will need to 1st identify the item (might be tricky since it is out of context and not where it normally is), and 2nd return the item to its rightful place.
As you search your house together, encourage your child to be curious and resourceful. Be a “constant commentator” and provide them with specific descriptions to help make connections that might otherwise be only visual. Use the “Extend” ideas below to increase the level of complexity and scope of the hunt, depending on the child's age.
Activity
Parent: Collect all of the items from the list below
Parent: Share each item one at a time.
Child: identify each item and return it to its rightful place.
- Spoon
- Pillow
- Toothbrush
- TV remote
- Favorite toy
- Shoes
- Hairbrush
- Scarf
- Backpack
Extend
Parent: Create a clue that describes the item. Share the clue before showing your child the item to see if they can guess what it is by your description. Assign points to each item. Have your child add up their total points at the end.
Practice using the items on the list.
Student: Journal-Draw or write about your hunt and the things you found. Were there items in your house you had never noticed before? Were there discoveries that surprised you?
Social Distancing - What does 6 feet look like?
Goals:
The student will be able to define social distancing, list the 3 ways that we practice social distancing and explain why we do it.
The student will be able to report 2 things in the home that are less than 6’ apart, 2 that are about 6’ feet apart, and 2 that are more than 6’ apart.
Given a sound cue, the student will be able to independently move 6’ or more from the sound.
What is social distancing?
Social distancing means keeping space between you and other people outside of your home. To practice social distancing:
- Stay at least 6 feet from other people
- Do not gather in groups
- Stay out of crowded places
Why do we practice social distancing?
To stop sickness from spreading to other people.
What is 6 feet?
The string is 6 feet long. It has a rubber band to mark each foot.
Find one end of the string and slide your fingers down the string, counting out each foot. Be careful not to move the rubber bands.
Now you stay at one end of the string and have an adult hold the same end. Ask the adult to slowly slide down the string and as they move away from you, tell you each time they find another rubber band. The adult will say “This is one foot”, “This is two feet” and so on, until the whole string is stretched between you. Practice that one more time, but this time, have the adult stay at one end as you slide your fingers down the string and say, “this is one foot”, “this is two feet” and so on.
Use the string to measure things in your house. How long is your couch? How far is it from your front door to the couch? How far is it from your bed to your bedroom door? How far is it from the microwave to the stove? When I call you, I will ask you to name 2 things that are less than 6 feet apart, 2 things that are about 6 feet apart, and 2 things that are more than 6 feet apart. Please make a list and have it ready.
Ask an adult to practice social distancing with you. Have the adult stand near you and you try to move 6 feet away. Use the string to check if you are too close, just right, or more than 6 feet away. Practice this in the living room, kitchen, bedroom, bathroom and on your front porch. Which rooms can you be 6 feet away? Which rooms are too small to practice social distancing?
Source: Thank you to Rikilynn Layher (COMS) Saginaw ISD.
Compass Directions
 When traveling around we need to be aware of our direction just in case we get lost. To help us we learn about the compass and its cardinal directions.
The cardinal directions on a compass are North, South, West, and East. They are located on a compass in a specific order.
Lesson adapted from https://familyconnect.org
The use of right and left is dependent on your direction of travel. Compass directions are permanent, and once you learn to use them, they make travel easier. You can learn the basics of right, left, front, behind, and more. These concepts are the first step in learning how to describe where things are. Compass directions take it to the next level and are the real tools that will be used while traveling.
Here are the basics:
- North and south are opposite of each other
- East and west are opposite of each other
- Standing in a box or in a small space, touch the north and south sides of it. North can be in front of you and south can be behind you.
- Now touch the east and west sides, west will be on your left and east will be on your right.
- Turn in different directions and touch the different directions saying them out loud.
The use of braille labels or symbols will help in making the sides a learning tool
Just as you memorize multiplication tables, it is important to memorize how the directions relate.
- When I face north, south is behind me, west is to the left, and east is to the right.
- When I face east, west is behind, north is to the left, and south is to the right.
- When I face south, north is behind, east is to the left, and west is to the right.
- When I face west, east is behind, north is to the right, and south is to the left.
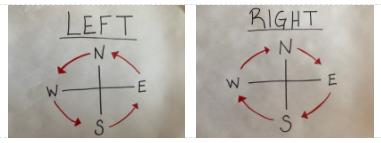
Attached are some images to help you remember which direction you travel based on what direction you turn.
This helps me remember the directions in order so I know when I make a turn I know which direction I am going.
- If I am making Right turns, I say Eat Sundaes With Nuts, Right now.
- If I am making Left turns, I say Eat Noodles With Soup, as Left-overs.
You can make your own saying. It does not have to start with E. You can start with any letter, but make sure they stay in the correct order when going left or right.

Now try our quiz to test what you've learned.
Explore Ann Arbor Area Transportation Authority
Complete the AATA website scavenger hunt set up for you on Google Forms. This will help you explore and get to know the website and bus system in the Ann Arbor and Ypsilanti area.
Go on a Listening Walk
Activity: Listen for sounds in your environment.
- Listen to the book, The Listening Walk by Paul Showers
- There are many sounds that you hear outside. Walking around your neighborhood sounds very different from walking downtown or out in the woods. You will hear many different kinds of sounds depending on where you walk. For this exercise, you will walk with your cane (if you have one) and a family member, around your neighborhood or backyard.
a. Listen, don't talk! What sounds do you hear?
b. What direction are these sounds in the environment coming from? (above you, below you, on your left, on your right)
c. Which sounds are far away from you and which are close?
d. What was your favorite sound? - When you get back home, describe, draw or list what you heard. Send an email or picture of your drawing to your Teacher for the Visually Impaired or Orientation and Mobility Specialist!
